


Get started
Watch a demonstration of this experiment and download the technician notes from the Education in Chemistry website: rsc.li/4kufYLC
If, like me, you whiled away many an hour as a child watching clouds change shape, you might have felt a desire to reach out and touch them. A desire which driving through heavy fog for the first time quickly snuffs out. Luckily, there is a way to create a simple cloud in the classroom using common household items, which demonstrates the conditions needed for condensation to occur, no fog lights required!
Use this demonstration when teaching evaporation and condensation at 11–14 and equilibrium at post-16.
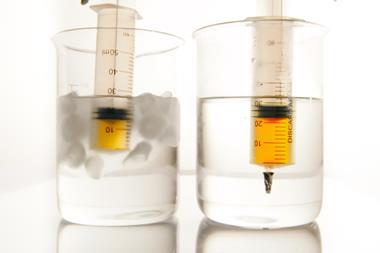
You can test the faulty model I shared at the end of ’Boiling without heating’ on pages 22 and 23 further with this demonstration. Use this demo when teaching evaporation and condensation at 11–14 and equilibrium at post-16.
If you whiled away many an hour as a child watching clouds change shape, you might have felt a desire to reach out and touch them. A desire which driving through heavy fog for the first time quickly snuffs out. Luckily, there is a way to create a simple cloud in the classroom using common household items, which demonstrates the conditions needed for condensation to occur, no fog lights required!
Kit
- Colourless, transparent plastic bottle with no labels
- Water
- Wooden splints
- Heat-resistant mat
Health and safety
- Read our standard health and safety guidance and carry out a risk assessment before running a live demonstration.
- Take care when lighting the splint.
Health and safety
- Read our standard health and safety guidance and carry out a risk assessment before running a live demonstration (rsc.li/45IUM4h)
- Take care when lighting the splint.
In front of the class
Having established that the class understands that clouds are collections of tiny droplets of water suspended in the air, show the bottle to the class and ask what we would need to add to the bottle to create one. Most will suggest adding some water.
Add enough water to saturate the air in the bottle (a few millilitres will suffice), replace and tighten the lid and shake the bottle thoroughly to disperse it and encourage evaporation. Ask the class how they could get as much liquid water back as quickly as possible. They are likely to suggest cooling the bottle. Explain that gases cool when they expand – this is why blowing on the back of your hand will feel cooler if you purse your lips. Get the class to try this. We’re assuming here that the gas expands adiabatically – but in most gas expansion phenomena that students experience, this is the case.
Explain that by repeatedly squeezing and releasing the bottle you can achieve the same effect. But, when you do so, no cloud will appear. This is where the final ingredient for clouds comes in – a source of nucleation in the form of tiny dust-like particles in the atmosphere.
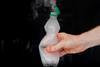
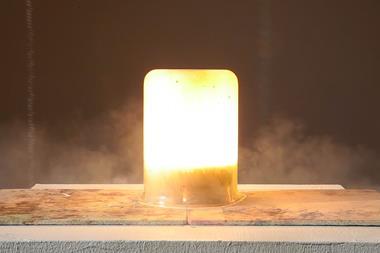
Open the water bottle, light a splint and hold it tilted downwards to encourage the flame to spread over a few centimetres of wood. Give it a quick wave to extinguish it and plunge the now-smoking tip into the bottle for a few seconds before removing it and placing it on the heat-resistant mat. There may be a slight haze in the bottle.
Squeeze and release the bottle a little before replacing the lid to show that nothing visible comes out, then repeat the squeezing and relaxing process. This time, after a few cycles, the opacity of the bottle’s contents will have greatly increased – you’ve formed a cloud.
More resources
- Mesmerise your class with this fluctuating fizzy practical as you teach kinetics and rates of reaction. Download the technician notes for an equipment list, preparation tips, and health and safety advice.
- Develop students’ ideas of particle models, particularly with respect to changes of state, using the Hot ice video and article.
- Inspire the next generation to consider teaching as a career. Share secondary school science teacher Alice’s job profile, including the salary range, career progression and more.
- Display the Water cycle poster and use the accompanying fact sheet and worksheet to get your 11–14 learners to construct their own cross-curriculum model.
For synergy with the Boiling without heating demonstration and to challenge the misconception that boiling is evaporation with heating, emphasise that each time you squeeze your hands, you are heating the gas in the bottle – the droplets in the cloud are evaporating with the addition of heat. Finally remove the lid, squeeze gently and the class will see puffs of cloud coming out of the bottle.
For synergy with the ‘Boiling without heating’ demonstration and to challenge the misconception that boiling is evaporation with heating, emphasise that each time you squeeze your hands, you are heating the gas in the bottle – the droplets in the cloud are evaporating with the addition of heat. Finally remove the lid, squeeze gently and the class will see puffs of cloud coming out of the bottle.
Teaching goal for 11–14
This simple effect shows students not only that water can evaporate and condense at temperatures close to room temperature, but also that to explain the importance of nucleating dust they need to apply a submicroscopic model that considers the motion and attraction of particles.
Particles in a gas are constantly moving about and colliding. If the collision between two of these particles has sufficiently low kinetic energy, the attractive forces between them may hold them together and start the process of building a condensate. However, with only one particle to ‘hold on to’, it is likely that the next collision will cause this tiny nascent droplet to break apart again.
The rate of evaporation is likely to be far greater than the rate of condensation. We can increase the rate of condensation by either reducing the temperature – so colliding particles are more likely to stick, by increasing the number of gaseous water particles in our bottle – so more collisions will be between particles of water. We can also increase the rate of condensation by reducing the curvature of the surface of the nascent droplet.
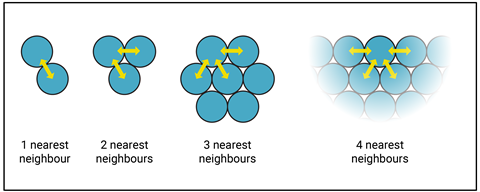
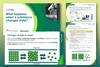
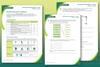
In a cluster of two particles, there is only one nearest neighbour to form attractive forces with. As the cluster grows, the number of particles that can gather around a particle at the surface also grows and the curvature tends towards zero. In the two-dimensional model shown in figure 1, we can pack a maximum of four particles around a particle at a flat surface.
In a cluster of two particles, there is only one nearest neighbour to form attractive forces with. As the cluster grows, the number of particles that can gather around a particle at the surface also grows and the curvature tends towards zero. In the two-dimensional model shown in the video and figure 1 of the article on the EiC website, we can pack a maximum of four particles around a particle at a flat surface.
The more attractive forces a particle experiences at the surface, the slower the rate of evaporation will be. So, if we allow a cluster of particles to build on a pre-existing scaffold, such as a speck of soot, then the cluster will start off with a far lower curvature and have the chance to grow.
Teaching goal for 16–18
Show older learners this effect and ask them to explain the partial pressure/vapour pressure effects when you squeeze the bottle and leave it to come to thermal equilibrium with its surroundings. This demonstration is also superb for developing students’ explanations of equilibrium effects. Sketching the particles in both situations will help them draw out their thinking.
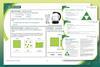
Students with a static model of the phase equilibrium are likely to draw something like figure 2a and predict that the vapour pressure of the water increases. Thinking about the vapour with a dynamic model would result in a diagram closer to figure 2b. The concentration (vapour pressure) of gaseous water particles remains the same in the lower volume due to an increase in the rate of condensation as you disturb the equilibrium. Considering the particles already present in the air helps to explain why the pressure increases in the bottle without affecting the vapour pressure.

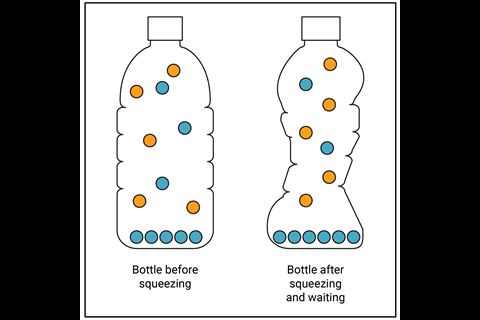
Students with a static model of the phase equilibrium are likely to draw the same number of water vapour particles in the bottle before and after squeezing, and predict that the vapour pressure of the water increases (rsc.li/3TPjykk). Thinking about the vapour with a dynamic model would result in a diagram with different numbers of water vapour particles in the bottle before and after squeezing, plus air particles. The concentration (vapour pressure) of gaseous water particles remains the same in the lower volume due to an increase in the rate of condensation as you disturb the equilibrium. Considering the particles already present in the air helps to explain why the pressure increases in the bottle without affecting the vapour pressure.
Declan Fleming
Downloads
Cloud in a bottle technician notes
Handout | PDF, Size 0.37 mbCloud in a bottle technician notes
Editable handout | Word, Size 0.73 mb
Additional information
Thank you to Pavel (Pasha) Mikhalkov for co-presenting this Exhibition chemistry video.
- Prepare(3)
 Resource
Students’ ideas about changes of state | Beyond appearances
Changes in state need changes in thinking to be understood, explore how to support learners to develop a new way of seeing state changes
 Resource
Improve graph skills for chemistry
A diagnostic exercise, practical and worksheet to assess and boost students’ grasp of graphing
 Course
Particle and atomic models | Self-led course
Strengthen your subject knowledge and discover teaching strategies to develop your learners’ understanding of the particle model and atomic structure
- Deliver(8)
 Class experiment
Supercooling and the energetics of freezing
Explore what happens when a liquid is supercooled and develop learners’ observation skills in this class practical
 Lesson plan
What happens when a substance changes state? | Lesson plan | 11–14 years
Use this lesson plan, complete with scaffolded and unscaffolded student sheets, to secure learners’ understanding of changes of state
 Class experiment
Melting and freezing stearic acid
In this class practical students take the temperature of stearic acid at regular intervals as they heat and cool it. Includes kit list and safety instructions.
 Resource
Melting and boiling | Johnstone’s triangle worksheets | 11–14 years
Develop learners’ understanding of melting and boiling with this worksheet, including a teacher demonstration for learners to observe
 Resource
Melting and boiling points | Developing understanding | 11–14 years
Deepen understanding of melting and boiling points and how these are represented at different conceptual levels of thinking
 Resource
Changes of state | Structure strip | 11–14 years
Use scaffolded prompts to support learners to write about changes of state
 Poster
Evaporation in action
Boost your 11–14 students’ knowledge and understanding of separation techniques with this poster, fact sheet and practical activity
 Poster
The science of melting chocolate
Use this infographic with your 11–14 students to develop their knowledge of changes of state and their graphing skills
- Literacy(3)
 Resource
Particle model | Key terms support | 11–14
Language support pack for particle model, with key terms list, accessible glossary, Frayer models and unscrambling definitions
 Resource
Particle model | Reading comprehension | 11–14 years
Use this reading comprehension based on a real science research news story to develop literacy skills and confidence
 Resource
Particle model | Structured talk | 11–14 years
In this speaking and listening task learners work together to build word bridges, building and sharing understanding by applying the particle model
- Enrich(6)
 Extension
Boiling point: a surprising measurement | Stretch and challenge | 11–14 years
Develop critical thinking skills by guiding learners to evaluate possible explanations for an unexpected experimental result
currently reading
 Exhibition chemistry
Forming a cloud in a bottle
Explore evaporation, condensation and equilibrium with this quick and easy demonstration
 Class experiment
Rate of evaporation
Use this class practical to measure and compare the rate of evaporation of propanone under different conditions
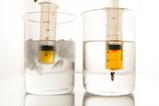
 Exhibition chemistry
Boiling without heating
Overcome common misconceptions about changes of state and vaporisation with water, a syringe and reduced pressure
 Resource
Salt (for cooking) activities | 11–14 years
Uncover the properties and health implications of salt in our diets
 Resource
Making ice | In Search of More Solutions | 11–14 years
Explore the properties of water and ice in this planning activity


No comments yet