


Investigate practical applications of endothermic reactions
The investigation should take approximately two hours to complete in full. It was initially created for 11–14 year-old learners but can be adapted for other age groups. Use in a sequence of timetabled lessons, science clubs or as part of an activity day.
Learning objectives
- Explain what is meant by ‘cold’.
- Describe some practical applications of reactions that give a temperature decrease.
Guidance notes
Slide 3 of the PowerPoint asks the question ‘What is cold?’ Give learners two minutes to discuss this question in pairs before sharing their answers as a class. Then ask them to order the six different situations from the coldest to the hottest, writing their answers down on mini whiteboards or paper.
Activity 1: cold packs
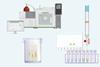
Use slide 6 of the PowerPoint to introduce endothermic reactions before the first activity. Learners will work in pairs or groups of three. They will investigate which of the six different compounds (ammonium nitrate, sodium chloride, sodium hydrogen carbonate, citric acid, calcium chloride and calcium sulfate) will produce the best cooling effect and therefore be the best to use in a cold pack. Find the method in the student workbook and instruct learners to record their and answers in their student workbooks too.
Depending on time, the pairs or groups could test all six compounds or could be allocated two or three different compounds to investigate. The class could pool their data at the end of the activity. If time allows, learners could repeat their tests. Encourage the learners to work scientifically by adding the same amount of water and solid to the beaker each time. Discuss why this is done and anything else that makes this a fair test. If there is time, ask the learners how they might improve the experiment.
Activity 2: citric acid and sodium hydrogen carbonate
Tell learners that they will mix solutions of citric acid and sodium hydrogen carbonate and measure the temperature of the resultant solution over three minutes. Ask them to consider why the reaction can’t be used in cold packs.
Your learners may already have one or both of these solutions from Activity 1. If not, they will have to follow the instructions from Activity 1 to make these solutions.
Use slide 13 to explain why this reaction is not suitable for cold packs. Tell learners that although mixing these two solutions gives a large temperature decrease, it can’t be used in cold packs as it gives off carbon dioxide gas as well as producing sodium citrate and water.

This resource was developed as part of the Chemistry for All project. The project was set up to explore and address barriers to participation in UK chemistry undergraduate study through a longitudinal project. Read the findings relevant to teachers, outreach providers, education policymakers and parents in the summary report, or download the full research report.
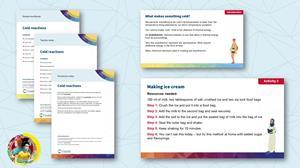
Activity 3: making ice cream
For use in the lab, do not use sugar or flavouring. This emphasises that this ‘ice cream’ can’t be eaten due to the lab setting.
Although the method instructs the learners to measure out 150 cm3 of milk, this does not have to be exact as the method works with volumes up to 200 cm3. As the learners must shake the bag for 10 minutes, encourage them to work together on this step, passing the bag to their partner when they get too tired. While shaking the bags, ask them to think about the reasons why they added the salt to the ice. Give them a few minutes to discuss their ideas in pairs/groups before sharing their thoughts as a class.
At the end of the time get the learners to remove the bags with the ice cream inside. They can touch it and press it but must not eat it. You could set Activity 3 as homework, where the learners can try the method again at home using sugar and flavouring.
Demonstration: glow sticks
This is a great demonstration of the concept of rate of reaction. Link the rate of a chemical reaction to the temperature of the surroundings. The effect of heating or cooling the glow sticks can be assessed by the brightness of the light given out. The brighter the light emitted, the higher the rate of reaction.
Ask learners why this kind of knowledge might be useful. In a chemistry context, controlling temperature is incredibly important. This is especially true when dealing with very reactive chemicals. If the temperature gets too high, you can end up with a runaway thermal reaction which could explode.
Find the answers to all the activities in the teacher notes and slides.
More resources
- Watch the Rates of reaction practical videos for both 14–16 and 16–18 year-old learners and download the supporting resources.
- Quiz your 11–14 year-old learners with these low-stakes questions on Explaining observations in energetics.
- Demonstrate an endothermic reaction between solid hydrated barium hydroxide and solid ammonium chloride and discuss the observations as a class.
Challenge
Use slide 21 to discuss how in the last 10 years there have been huge leaps in cooling the body down to preserve it and make survival from surgery more likely. Introduce cryonics (also known as cryogenic freezing), where someone can be frozen so they can potentially be revived in the future. Science fact or science fiction? Let the learners discuss this, as there really isn’t a clear answer. Task your learners to research the technique to find out more.
Health and safety
Read our health and safety guidance and carry out a risk assessment before running any live practical.
The safety equipment suggested is in line with CLEAPSS requirements. For non-hazardous substances, wearing lab coats can help to protect clothes. The safety rules might be different where you live so it is worth checking local and school guidance.
Careers
The Chemistry for All project found that recognising the value and importance of chemistry, and appreciating how chemistry can lead to interesting and well-paid jobs strongly related to learners’ future aspirations. Discover how chemistry can prepare learners to pursue apprenticeships, university courses and vocational routes, or browse job profiles and try our career options game from A Future in Chemistry.
After the starter, introduce Robert, a consumer products technician. Watch his video job profile (also available on slide 7 of the PowerPoint) and learn how he studies the behaviours of different materials to develop and improve the properties of products, such as cold packs used to treat sports injuries. Link the context of Activity 3 to careers by watching Claire’s video job profile on slide 15. She is a flavourist and innovation director and applies her chemistry knowledge and understanding to create new flavours, find raw materials and develop technologies.
Find more activities like this, plus longer projects suitable for off-timetable days, science lessons or clubs on our Outreach resources hub.
Downloads
Cold reactions student workbook
Editable handout | Word, Size 0.49 mbCold reactions student workbook
Handout | PDF, Size 0.45 mbCold reactions teacher notes
Editable handout | Word, Size 0.49 mbCold reactions teacher notes
Handout | PDF, Size 0.53 mbCold reactions technician notes
Editable handout | Word, Size 0.48 mbCold reactions technician notes
Handout | PDF, Size 0.41 mbCold reactions presentation slides
Presentation | PowerPoint, Size 2.43 mbCold reactions presentation slides
Presentation | PDF, Size 1.46 mb
Additional information
This resource was originally developed by the University of Reading to support outreach work delivered as part of the Chemistry for All project.


No comments yet