


Rate of reaction can be determined through monitoring how fast a reactant is used up or how fast a product is formed
Learn to monitor the rate of reaction and identify the effects of changing temperature and concentration, using both initial rate and continuous monitoring methods.
Chapter titles: 00:10 Introduction to rates of reaction experiments; 01:48 Initial rate method: the iodine clock; 06:33 The iodine clock reaction; 09:14 Continuous monitoring method: volume of gas; 11:27 Real-time results for 25°C; 13:50 Set-up with a water bath; 14:10 Real-time results for 60°C; 16:09 Real-time results for 80°C
Teacher notes
Full teacher notes are available in the supporting resources booklet, including ideas for how to use this video and the supporting resources as part of your teaching.
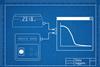
Rate of reaction can be determined through monitoring how fast a reactant is used up or how fast a product is formed. An initial rate method measures how long it takes for a reaction to go to completion or for a specified volume/mass of product to form. A continuous rate method measures the rate of reaction of the course of a reaction, usually by making a measurement at regular time intervals.
In most instances, students will be expected to understand how changing the temperature or concentration affects the rate of reaction and how, given the reactants/products of the reaction, a method might be developed to monitor the rate.
This video supports two experiments that can be used to demonstrate each approach:
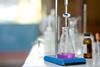
- Initial rate method – investigating the effect of concentration on rate using the iodine clock reaction.
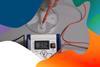
- Continuous monitoring method – investigating the effect of temperature on rate by measuring volume of gas produced.
Teaching rates of reaction at 14–16 too? Watch the practical video to show learners how the concentration of sodium thiosulfate solution affects its rate of reaction with hydrochloric acid. Plus, download the resources for teacher and technician notes, follow-up worksheets and more.
Technician notes including the equipment list and safety notes are provided. If you are planning to carry out the practical in the classroom, you will need to carry out your own risk assessment.
Prior knowledge
In order for students to succeed with rates of reaction at post-16, it is essential that they have a good knowledge and understanding of key chemistry concepts met during pre-16 chemistry courses, including:
- the concept of rate
- particle model of matter
- collision theory
- factors affecting the rate of reaction, such as surface area, temperature and concentration.
- activation energy
- catalysis
In working scientifically students should be able to:
- measure the rate of reaction by collecting a gas
- measure the rate of reaction by monitoring a colour change
They also need to be able to use and apply previously met mathematical ideas in a chemistry context, for example:
- draw a graph with a line/curve of best fit
- calculate the gradient of a graph, and draw a tangent to the curve
- a good understanding of units
Before meeting these rates of reaction experiments, students should also understand the rate constant, k, the rate equation and orders of reaction from their post-16 studies.
Common misconceptions
Since students first meet many of the ideas associated with rates of reactions pre–16 and this often comes with a lack of understanding of basic principles, it would be worthwhile spending some time at the start of the topic to make sure that they are secure in the following concepts:
- Application of both the particle and collision theory.
- The connection between surface area and rates.
- Interpretation of rate graphs.
You could use the prior knowledge check worksheet with these resources, a modified version of the Starters for 10: Kinetics – 7.1 collision theory, and see how they do.
Another common misconception at pre-16 level is that students often confuse rate of reaction with position of equilibrium. This can then lead to further confusion further down the line at post-16 when they are introduced the rate constant k, and the equilibrium constant Kc. Students need to be aware that they are not the same constant. This misunderstanding can lead into the further misconception that you can write a rate equation (rate law) using stoichiometry rather than using order of reaction with respect to reactants.
Students need to understand that rate equations are constructed based on empirical experimental data; and that the equation is based on the best fit of data to a mathematical model. It is also important that students appreciate that the mathematical models are evaluated based on how well they fit empirical data! A good way to illustrate this point is to ask the students to plot out the mathematical models and then relate it to the rate equation. First, they can plot out the mathematical graphs by substituting values for x in the equations – then show the experimental data and link the graphs to the rate equations.
Further practical activities and other resources
For an exciting visual demonstration, Burning milk powder highlights the true impact that increasing the surface area to volume ratio can have on the rate of reaction.
More support is available in this CPD article Teaching rates of reaction post–16. Another article, Rationalising rates, includes tips for teaching rates of reaction using graphs.
Also check out …
- Rates of reaction – this CPD article explains how the concept of reaction rates could be introduced.
- Gradients and rates of change – this article highlights the maths skills students need to correctly interpret graphs.
- Rating rate laws – not all students have developed the mathematical understanding alongside their experimental knowledge. Using recent research, this article shows how to help students develop a deeper understanding of mathematical model-building.
- Process chemist - find out more about how Erin’s work as a higher apprentice helps refine processes to mass produce new medicines for patients.
Downloads
Rates of reaction: supporting resources
Handout | PDF, Size 0.98 mbRates of reaction: supporting resources
Editable handout | Word, Size 1.69 mbRates of reaction: technician notes
Handout | PDF, Size 0.5 mbRates of reaction: learner notes
Experiment | PDF, Size 0.17 mbRates of reaction: learner notes
Experiment | Word, Size 0.2 mbRates of reaction: integrated instructions
Experiment | PDF, Size 0.14 mbRates of reaction: integrated instructions
Experiment | PowerPoint, Size 68.88 kb
Additional information
The original video script and supporting resources were written by Dorothy Warren. The integrated instructions were produced by David Paterson and the technician notes were written by Sandrine Bouchelkia.
Practical videos | 16–18 years
- 1
- 2
- 3
- 4
 Currently reading
Rates of reaction
- 5
- 6
- 7
- 8
- 9
- 10
- 11
- 12
- 13


1 Reader's comment