


Carry out this practical and use the follow-up questions to explore an important fermentation reaction
Add some fresh context to this classic experiment with Is fermented food and drink good for us? in Education in Chemistry. The article tucks into the science of fermentation and its everyday applications, from kombucha to kefir, and puts the supposed health benefits under the microscope.
Beer and wine are produced by fermenting glucose with yeast. Yeast contains enzymes that catalyse the breakdown of glucose to ethanol and carbon dioxide. In this experiment, learners will set up a glucose solution to ferment and then test the products. You may also demonstrate distilling the fermentation mixture to separate the ethanol formed or set this as a learner activity.
The experiment is part of the Nuffield practical collection, developed by the Nuffield Foundation and the Royal Society of Chemistry. Delve into a wide range of chemical concepts and processes with this collection of over 200 step-by-step practicals.
Learning objectives
- Carry out and observe a fermentation reaction.
- Test the products of a fermentation reaction.
- Explain the conditions needed for a fermentation reaction.
The experiment allows learners to cover the first two learning objectives. Use the questions to test their results and observations. Questions 4–6 cover the third learning objective and ask learners to explain the conditions required. Use question 7 to see if learners can connect this experiment to rates of reaction. To stretch learners, expand this question and ask them to write a full plan. Find the answers in the Teacher notes.
How to use this resource
Part 1
Set learners the first part of the experiment. It usually yields results within a lesson if the water is at the correct temperature and the reaction mixture is well mixed to begin with. It also depends on the freshness of the yeast. Dried yeast does work. If fermentation is not rapid because of the yeast used, then carry the whole experiment over to the next lesson.
For an alternative practical arrangement to part 1, use a bung and delivery tube to bubble the carbon dioxide through limewater. Or watch the Identifying ions practical video from 08:20 to see how to use a pipette to collect the gas when testing for carbonate ions.
Part 2
In the second part of the experiment, you can demonstrate distilling the reaction mixture. Watch the Fractional distillation and Simple distillation videos and download the accompanying resources for setup, method and more learner-facing activities on simple distillation.
If you demonstrate distillation, pool the class results and filter the groups’ solutions into your distillation flask. Significant quantities of yeast will produce foaming and you can carry this over into the product if you do not filter the reaction mixture. Collect the fraction between 77–82°C. Ethanol boils at 78°C. This fraction should burn easily compared with the non-flammable original solution. Pour the ethanol away immediately and do not keep or reuse it.
Alternatively, set the distillation practical as a learner activity. Individuals or pairs may not produce enough ethanol to complete the distillation so learners may need to combine their solutions and work in groups.
More resources
- Use our organic chemistry worksheet on alcohols with 14–16 learners for practice in applying knowledge in context, including burning alcohols in cooking and as fuels.
- Link your lessons on fermentation and bioethanol to UN sustainable development goal 8 while developing learners’ literacy skills with this resource on E10 petrol and climate change.
- Learn how a circular approach to manufacturing at British Sugar means there is virtually zero waste, including how they create coproducts such as bioethanol, by watching Paul’s video job profile.
- Download the classroom activity and display the fractional distillation poster in your classroom to help 14–16 learners understand this important separating technique.
Technician notes
Read our Standard health and safety guidance and carry out a risk assessment before running any live practical.
Ensure learners wear safety glasses.
Be aware that if the fermentation is fast, the mixture may overflow from the flask.
Equipment (per group)
- 100 cm3 conical flask
- 50 cm3 measuring cylinder
- Boiling tube
- Boiling tube rack
- Access to a mass balance, correct to 1 decimal place
- Cotton wool – enough to plug the conical flask
- Safety glasses
Chemicals (per group)
- Glucose, 5 g – not currently classed as hazardous. See CLEAPSS Hazcard HC040c for more information.
- Yeast (as fast acting as possible), 1 g
- Limewater, 5 cm3 – 0.02 M aqueous solution of calcium hydroxide. Not currently classed as hazardous but best to treat as a skin and eye irritant. See CLEAPSS Hazcard HC018 and recipe book RC020, or below.
-
Wear eye protection and measure 5 g of calcium hydroxide.
-
Add, while stirring, to 300 cm3 of water in a large beaker.
-
Continue to stir the suspension, then pour it into a clean, labelled 2.5 dm3 screw-top bottle using a funnel.
-
Fill the bottle with distilled water and tightly close the lid. Invert it to mix.
-
Leave the bottle overnight to allow the suspension to settle.
-
When required, slowly pour the limewater into small, labelled bottles.
-
Add more distilled water and/or calcium hydroxide to the stock bottle as required.
-
- 50 cm3 of warm water 30–40°C
Procedure
Part 1
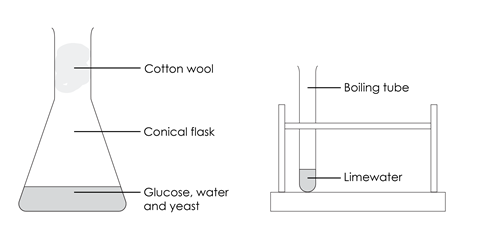
- Put 5 g of glucose in the conical flask and add 50 cm3 of warm water. Swirl the flask to dissolve the glucose.
- Add 1 g of yeast to the solution and loosely plug the top of the flask with cotton wool.
- Wait while fermentation takes place. The time it takes will depend on the temperature, how well you mixed the reactants and the yeast’s freshness.
- Add 5 cm3 of limewater to the boiling tube. Avoid contact with your skin as limewater is an irritant.
- Remove the cotton wool and pour the invisible gas into the boiling tube containing limewater. Take care not to pour in any liquid as well.
- Gently swirl the limewater in the boiling tube and note what happens.
- Replace the cotton wool in the top of the flask.
Part 2
- Remove the cotton wool and note the smell of the solution.
If you are going to observe the distillation then you, or your teacher, will:
- Filter all the groups’ solutions into a distillation flask.
- Distil the mixture and collect the distillation fraction between 77–82°C.
The distillation fraction should easily burn.
Downloads
Fermentation of glucose using yeast student sheet
Handout | PDF, Size 0.24 mbFermentation of glucose using yeast teacher notes
Handout | PDF, Size 0.21 mbFermentation of glucose using yeast student sheet
Editable handout | Word, Size 0.47 mbFermentation of glucose using yeast teacher notes
Editable handout | Word, Size 0.42 mb
Additional information
This is a resource from the Practical Chemistry project, developed by the Nuffield Foundation and the Royal Society of Chemistry. This collection of over 200 practical activities demonstrates a wide range of chemical concepts and processes. Each activity contains comprehensive information for teachers and technicians, including full technical notes and step-by-step procedures. Practical Chemistry activities accompany Practical Physics and Practical Biology. Updated in 2024 with additional student questions by Neil Goalby.
© Nuffield Foundation and the Royal Society of Chemistry


2 readers' comments