


Ideally suited to lessons on electrolysis and displacement of halogens
Mae’r adnodd hon gael yn Gymraeg

Cael y fersiwn Gymraeg.
Following integrated instructions, learners will observe the electrolysis of copper chloride. Read our article How to teach extraction of metals for more support and ideas for teaching this topic. Link to a full-scale version of this practical and find questions, Frayer models and a structure strip at Electrolysis of aqueous solutions.
Download this
All the information you need to prepare, set up and run this experiment with your learners:
- Technician notes as pdf and MS Word
- Integrated instructions as pdf and MS PowerPoint
- Integrated instructions (Welsh) as pdf and MS PowerPoint
Learning objectives
- Make detailed and accurate observations of what is happening at the positive and negative electrode.
- Use your observations to infer what is happening during electrolysis.
Equipment (per group)
- Copper chloride (0.5 mol dm-3), approx. 1 ml
- Potassium iodide (0.1 mol dm-3), few drops
- Potassium bromide (0.1 mol dm-3), few drops
- Blue litmus paper
- Petri dish, with two holes in the sides for electrodes to pass through
- 2 x carbon fibre electrodes, 1 mm diameter (kite rods work well)
- 2 x crocodile clips or connector blocks (cut to size)
- 2 x electrical leads
- 9 V battery or 9 V DC power supply
- 4 x pipettes or dropper bottles for solutions
- Print out of integrated instructions
Safety equipment
- Eye protection: safety glasses to EN166 F
Equipment set-up
To carry out this experiment, each group will require a Petri dish with two holes drilled through. If access to a drill is problematic, you can make the holes using a hot needle heated in a Bunsen burner flame. By conducting this experiment on a microscale in a Petri dish, you will significantly reduce the risks associated with the production of chlorine gas.
You can use a holder made from Corriflute or Perspex. The holders are optional, but they do provide stability and help to hold the electrodes in the correct position. If not, use a small piece of adhesive putty (such as Blu Tack) to keep the electrodes in place.
Learners can use a print out of the integrated instructions (available in English and Welsh) to guide them through setting up the experiment.
Safety
- Read our standard health and safety guidance and carry out a risk assessment before running any live practical.
- Please note that although working on a microscale reduces the amount of chlorine gas produced, some will still be present in the environment. To mitigate this risk, make sure you are working in a well-ventilated area. Chlorine gas is oxidising, toxic and dangerous to the environment, see CLEAPSS Hazcard HC022.
Read the technician notes for full safety information, preparation, disposal and technician tips.
Method
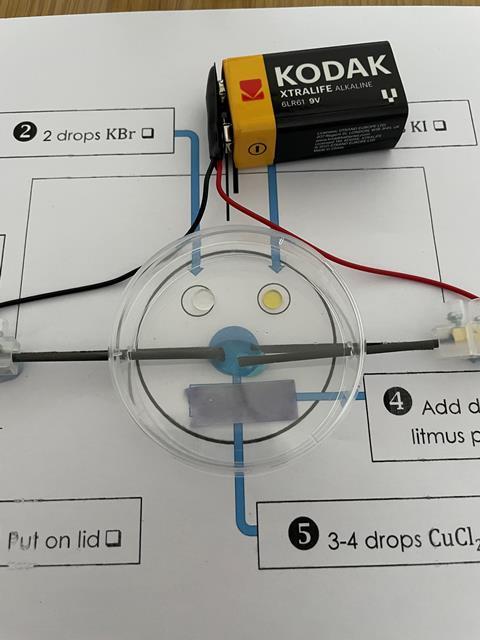
- Arrange the electrodes so that they are in the centre of the Petri dish about 1 cm apart. Place the Petri dish on top of a labelled diagram to make it easier to record your observations. Note: do not connect to the power supply until you are ready to start the experiment as chlorine gas could be released into the room.
- Add two drops of potassium bromide solution to one side of the Petri dish.
- Add two drops of potassium iodide solution to the Petri dish. This should be on the same side as the potassium bromide but not close enough for the chemicals to mix.
- Place a piece of damp blue litmus paper on the other side of the Petri dish.
- Add 3–4 drops of copper chloride solution to the reaction vessel so that it covers both the electrodes.
- Place the lid on the Petri dish.
- Finally, connect the wires to the power supply. Clip the crocodile clips onto the electrodes (or use connector blocks) and observe.
Expected results
- An orange/brown solid can be observed forming at the negative electrode, in this experiment the solid produced is copper.
- Bubbles can be observed at the positive electrode indicating the formation of a gas, in this example the gas is chlorine.
- The drop of potassium bromide acts as an indicator, changing from colourless to orange as chlorine displaces the bromide ions and produces bromine.
- The drop of potassium iodide also acts as an indicator, changing from colourless to brown as chlorine displaces the iodide ions and produces iodine.
- The damp blue litmus paper is bleached, indicating the presence of chlorine.
Disposal
At the end of the experiment:
- Clean the negative electrode with either sandpaper or wire wool, if necessary, to remove the copper deposits.
- Place the Petri dish in a bucket of water. Dispose of the water down a foul water drain.
More resources
- Explore the reactivity series of metals with this series of experiments and supporting resources.
- Help your 14–16 year old learners master this tricky topic with our teaching tips for explaining electrolysis.
- Help your learners overcome common electrolysis misconceptions and correctly identify electrodes with the student worksheet and teacher notes, including answers.
- Meet Gemma a product and process development manager at Tata steel.
Downloads
Microscale electrolysis technician notes
Handout | PDF, Size 0.39 mbMicroscale electrolysis integrated instructions
Handout | PDF, Size 0.47 mbMicroscale electrolysis integrated instructions Welsh
Handout | PDF, Size 0.45 mbMicroscale electrolysis technician notes
Editable handout | Word, Size 0.75 mbMicroscale electrolysis integrated instructions
Editable handout | PowerPoint, Size 0.56 mbMicroscale electrolysis integrated instructions Welsh
Editable handout | PowerPoint, Size 0.56 mb
Additional information
This resource is based on a method developed by CLEAPSS, PP059 Micro-electrolysis of copper(II) chloride solution, available from the CLEAPSS science website.


No comments yet